Many online stores are based on the Prestashop solution. The contact page, too often neglected, is an essential element of the store. It’s the link between you and your customers. Depending on the page’s appearance and the elements proposed in the contact form, the customer’s impression can be good or bad. It’s therefore important to personalize the Prestashop contact form so that it reflects the image you want to convey to your customers. There are several ways to achieve this, depending on whether you want to delve into the code or use a turnkey module.
Prestashop 1.7
Prestashop is a complete e-commerce solution. Like a CMS (Content Management System) such as WordPress, Joomla or Drupal, which lets you quickly create a website to publish content, Prestashop provides everything you need to set up an e-commerce site. Prestashop 1.7 is built from proven components (notably the Symfony PHP framework), is totally secure and RGPD compliant. It provides all the tools needed to manage a product catalog, customers and orders, as well as SEO and internationalization. An official marketplace enables the addition of numerous modules (or add-ons), both free and paid, to further extend the store’s functionalities.
Basic configuration of the PrestaShop 1.7 contact form
Go to contact module
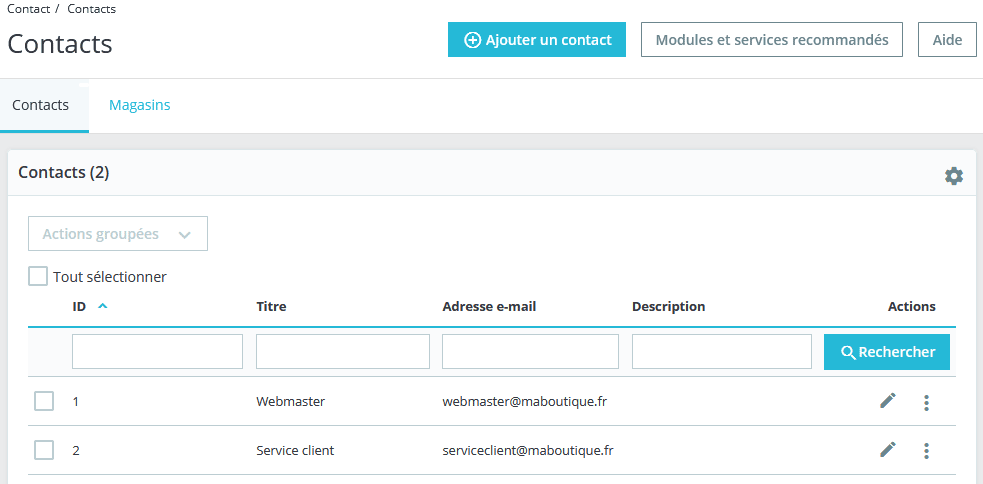
In your back office, go to “Shop settings”. > Click on “Contact” to configure your company’s contact information. Click on “Add a contact” to create new contact points (customer service, technical support…) by entering a title and associated e-mail address. This function adds a drop-down menu to your contact form, from which the customer can select the appropriate service.
Message saving options
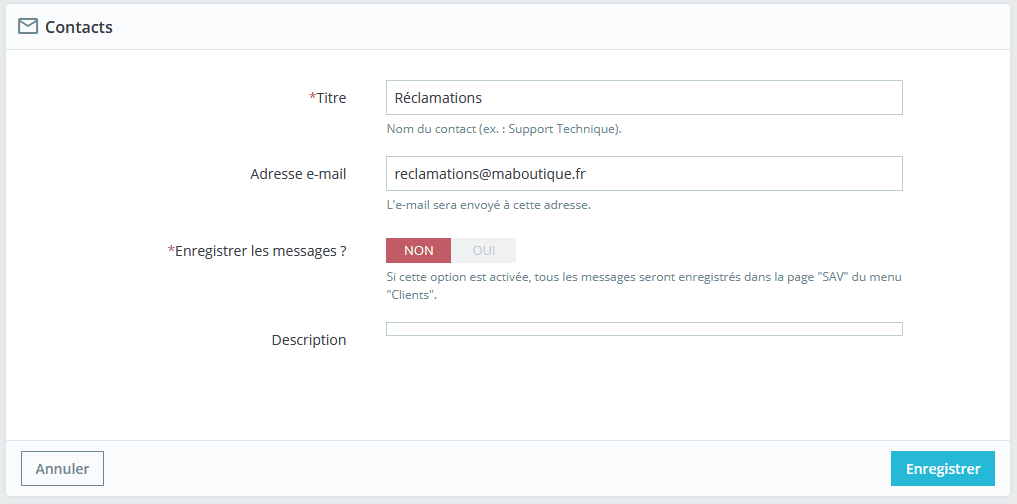
PrestaShop offers an option for saving messages in the customer service department. Activate this function to centralize all communications and facilitate customer follow-up directly in your administration area.
Advanced form customization
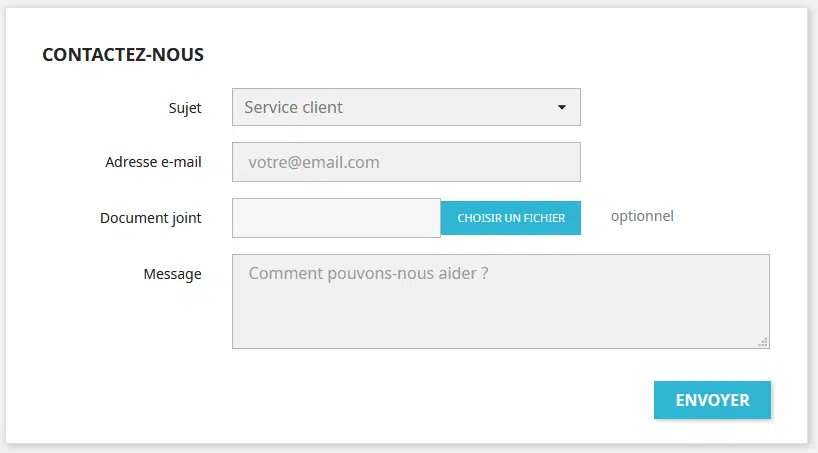
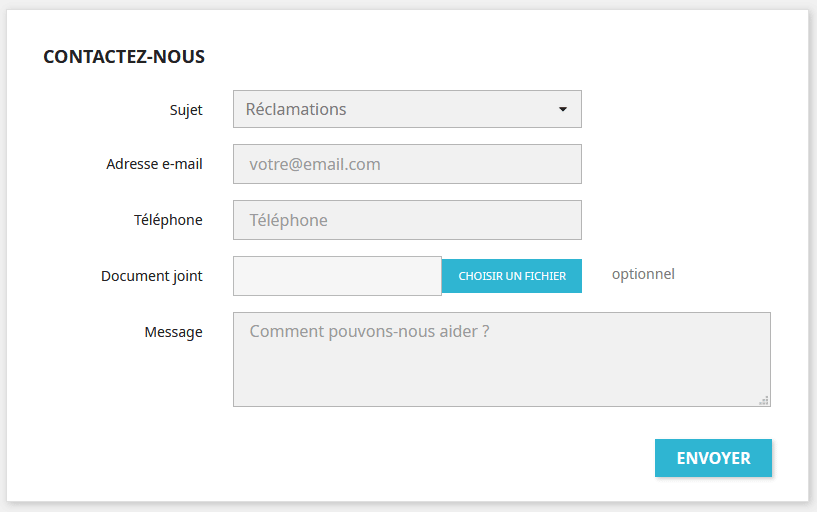
At the end of the Prestashop 1.7 installation, which only takes a few minutes, you have a fully operational e-commerce site. Of course, there’s still work to be done if you want to customize the site’s interface to your brand’s colors, as well as to enter your entire catalog, define categories… We’re going to focus here on a very important element of any e-commerce site: the contact form. It’s the privileged point of contact between you and your customers. Prestashop naturally provides a default contact form, with the classic fields “Subject”, “Email address”, “Attached document” (if the customer wishes to send you a document) and “Message”. Depending on your activity, you may need to add additional fields or modify the appearance of the form.
Contact management
When the store is created, two contacts are created by default. The “Webmaster” address, to which all technical questions will be directed, and “Customer Service” for questions relating to products or the store in general. Depending on the option selected in “Subject”, the message entered in the form by the customer will be sent to the right address. You can add as many contacts as you like by clicking on the “Add a contact” button at the top of the page.
Fill in the form and click on “Save”. The new contact address is created and the contact form is automatically updated.
Adding a field to the form
If you want to add a field or modify an existing field in your contact form, you’ll need to know a bit about web development, particularly HTML (for display) and PHP (for Prestashop to take into account and process the new field).
Modifying the “template” file
To begin with, you need to know that Prestashop’s display is managed using “templates” or “models”, grouped together in a “theme”. This “template” is an empty template that simply gives the structure of the page, which will then be filled in with various types of information. Our contact form, for example, contains a drop-down list which will then be filled in with the contacts created for the store. We’ll need to modify this template to add the new field. Let’s assume, for the sake of simplicity, that we’re using the default “classic” theme (the process will be identical whatever theme we use). We’ll start by creating what we call a “child theme”. This is a customized theme, derived from the main theme. It would be entirely possible to dispense with the child theme and make modifications directly in the parent theme. The disadvantage is that the first time you update the parent theme, all your changes will be overwritten and lost. You’d have to start all over again. When the parent theme is updated, the child theme remains unchanged. To create the child theme, simply create a new “themes/classic-enfant” directory (you can name it anything you like, as long as the name is self-explanatory). Create a “config” directory and place in it a “theme.yml” file containing the following code: parent: classic name: classic-enfant display_name: Classic enfant version: 1.0.0 assets: use_parent_assets: true This file allows Prestashop to identify the child theme. The original template file for the contact form is located in the “/themes/classic/modules/contactform/views/templates/widget/” directory and is called “contactform.tpl”. Copy this file and the original tree structure to the “classic-enfant” directory. We can now edit this file to add a “Phone number” field, for example. Add the following code to the “contactform.tpl” file:
<div class="form-group row">
<label class="col-md-3 form-control-label">Téléphone</label>
<div class="col-md-6">
<input class="form-control" name="telephone" type="text" placeholder="Téléphone" value="{$contact.phone}">
</div>
</div>
This code indicates that a new text input field called “telephone” will be added to the form.
New field in the contact form taken into account
It’s not enough to create a new field in the template, it must also be taken into account by Prestashop. The contact form is managed by the “contactform” module. Since we need to create a child theme so that an update doesn’t overwrite the changes made, we need to “override” the “contactform” module. Let’s start by creating the following file (and directory tree): “/override/modules/contactform/contactform.php”. The basic source code will be as follows:
<?php if (!defined(‘_PS_VERSION_’)) { exit; } class ContactFormOverride extends Contactform { // Code to be completed } The line “// Code to be completed” will now be replaced by our own code. The small amount of code in the file indicates that we’re going to extend the basic operation of the contact form. Open the original file “/modules/contactform/contactform.php” and copy the two functions (or methods, as this is a PHP class) getWidgetVariables and sendMessage. The first function will allow us to retrieve the value of the “Phone” field, while the second will allow us to insert this value into the email sent. In getWidgetVariables, add the following lines of code… // Start adding the “Phone” field $this->contact[‘phone’] = html_entity_decode(Tools::getValue(‘telephone’)); // End adding the “Phone” field … just before the line: $this->contact[‘contacts’] = $this->getTemplateVarContact(); In sendMessage, you’ll need to insert code in three different places. Add these lines of code… // Start adding field “telephone” $telephone = trim(Tools::getValue(‘telephone’)); // End adding field “telephone” …just after these: $extension = [‘.txt’, ‘.rtf’, ‘.doc’, ‘.docx’, ‘.pdf’, ‘.zip’, ‘.png’, ‘.jpeg’, ‘.gif’, ‘.jpg’]; $file_attachment = Tools::fileAttachment(‘fileUpload’); $message = trim(Tools::getValue(‘message’)); This retrieves the value entered in the form field. Add these lines of code… // Start validation field “telephone” elseif (!Validate::isCleanHtml($telephone)) { // Control the telephone field. $this->context->controller->errors[] = $this->trans(‘Invalid Telephone’, array(), ‘Shop.Notifications.Error’); // End validation field “telephone” … just after these : } elseif (!Validate::isCleanHtml($message)) { $this->context->controller->errors[] = $this->trans( ‘Invalid message’, [], ‘Shop.Notifications.Error’ ); } This checks the validity of the field content.
Finally, add this line of code… ‘{telephone}’ => Tools::nl2br(stripslashes($telephone)), // Taking the phone field into account … just after these: $var_list = [ ‘{order_name}’ => ‘-‘, ‘{attached_file}’ => ‘-‘, ‘{message}’ => Tools::nl2br(Tools::stripslashes($message)), ‘{email}’ => $from, ‘{product_name}’ => ”, This adds the value entered in the field to the list of data sent in the email.
Modification of the templates used to generate the email sent by the form
Copy the “/mails/en/contact.html” and “/mails/en/contact.txt” files into the “/themes/classic-enfant/mails/en/” directory. Add the following code to the “contact.html” file:
<!– DEBUT ADD TELEPHONE FIELD CONTENT –>
<tr>
<td align=”left” style=”border-collapse: collapse; mso-table-lspace: 0pt; mso-table-rspace: 0pt; font-size: 0px; padding: 10px 25px; word-break: break-word;”>
<div style=”font-family:Open sans, arial, sans-serif;font-size:16px;line-height:25px;text-align:left;color:#363A41;” align=”left”>
<span class=”label” style=”font-weight: 700;”>Customer phone:</span> <style=”color:#25B9D7;font-weight:600; text-decoration: underline;”>{telephone}</span>
</div>
</td>
</tr>
<!– END ADD TELEPHONE FIELD CONTENT –>
Add the following code to the “contact.txt” file: Customer phone :
{telephone}
Activate child theme
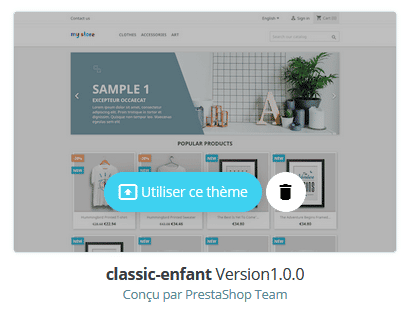
If you update the display of the contact form, you still don’t see the new “Phone” field. This is normal, as Prestashop still uses the “Classic” theme by default. To tell it to use the “Classic child” theme, go to the “CUSTOMIZE” menu and select “Theme and logo”. You should see the child theme appear, and be able to activate it by clicking on “Use this theme”.
Once the theme has been activated, refresh the page containing the contact form. The “Phone” field should now appear.
Insert a page on the contact form
If you want to incorporate information into your contact form without having to modify it each time, you can use a CMS page. Start by creating a new CMS page in which to save the content you wish to display in the contact form. Once this page has been created and saved, it will appear in the list of CMS pages. Locate its “ID” identifier, which you’ll then use to reference it. As we’ve already used a Contact module overload for the form template, we’ll now create a module controller overload (the functionality that “decides” what will be displayed in the template). Create the file “/override/controllers/front/ContactController.php”. Insert the following code:
<?php class ContactController extends ContactControllerCore { { public function initContent() { parent::initContent(); $cms = New CMS(1,$this->context->language->id); $this->context->smarty->assign(array(‘cms_contact’ => $cms)); } } This code will retrieve the content of a CMS page. Here “1” is the ID of the page concerned. It must be replaced by the ID of the page created previously. The content of this page will then be known in the template as “cms_contact”. Next, modify the contact form template file again and insert the following code at the point where you wish to add the content: {if $cms_contact->content}
<section id=”intro_contact”>
{$cms_contact->content}
</section>
{/if}
Save the file, clear the Prestashop cache and refresh the contact page. The expected content should appear.
Using add-ons
As we’ve seen, modifying the basic contact form in Prestashop is no easy task. You need to have at least some knowledge of HTML, CSS and PHP. If you’re not at ease with these languages or with development in general, the solution is probably to turn to modules or add-ons. A Prestashop module is a set of code designed to perform a particular function. Some modules (such as the basic contact form) are included in Prestashop by default. Others can be added. Some are free, others are not. It all depends on what you need. Of course, contact forms are no exception, and there are a number of modules available for this purpose. However, these modules have to be paid for, and cost from around 50 to 100 euros, depending on the functionality they provide. To name just a few of the modules available, we’d like to highlight the following:
- Contact Form Ultimate – Form generator: this is a drag-and-drop form generator. All field types are available, from text to captcha to document. It’s very complete, allowing you to generate any type of form, including contact forms, and display them wherever you like.
- Ajax contact form on product page: this module provides access to a contact form directly from a product page. The form uses Ajax, meaning that when the message is sent, the page is not reloaded and the customer can continue to consult the product.
- Form Builder: creates contact forms, product forms, etc. Bootstrap compatible.
- Contact Form 7: powerful module for managing contact forms. Fully customizable, forms can be displayed anywhere on the site.
- Custom Contact Forms: this module lets you add custom fields, checkboxes and conditional text fields based on user responses.
- Advanced Contact Form: this module offers advanced options such as the integration of dynamic fields and validation rules.
- Contact Form Slide: this module offers a pop-up display of the contact form on all pages, without redirection. This type of module enhances the user experience by making the form more accessible. You can download it free of charge from the PrestaShop marketplace.
Resources and video tutorials
If you’d like to learn more about forms in Prestashop, here are two tutorials that might help:
- “Setting up the contact and registration form in Prestashop 1.7“: this video shows how to set up a form in Prestashop 1.7: checkbox, email address, blocks…
- “How to edit email templates in PrestaShop 1.7“: although this video focuses on email template customization, it includes principles applicable to form configuration and customization, which may be useful if you’re looking to modify or enhance forms in PrestaShop.
To conclude on customizing the Prestashop 1.7 contact form
It’s entirely possible to customize your Prestashop contact form. By customizing your contact form in PrestaShop 1.7, you can offer your customers a more tailored and professional experience. Whether by adding custom fields, saving messages or using interactive modules, these adjustments help improve customer satisfaction and the responsiveness of your online store. If you don’t have any particular knowledge of web development or don’t want to call in an outsider, you can invest in a module that will do most of the work for you. This will require a bit of configuration and research, but you won’t have to delve into the source code. If you have a very specific need, you can override the default contact module. You’ll need some knowledge of HTML, CSS and PHP development, or you can call on the services of a Prestashop specialist.